Thursday, March 3, 2011

Sushi How To


Making sushi is a time consuming process with lots of little steps along the way.  There is also alot of different ingredients required.  But when you have the finished product in front of you it is totally worth it!  The following is a step by step guide for making California Rolls...

First step is the rice!  You need short grain sushi rice, regular rice will NOT work!  The short grain rice will become very sticky when it is cooked.

In my opinion a rice cooker is essential and a good solid investment.  I use this bad boy ALL the time!  Just add rice and water and turn it on and the rice cooker does all the work for you.
Steve's sushi rice recipe is 1 Cup rice to 1 1/2 Cups Water


While the rice is cooking you can gather the other supplies you will need and make the wasabi. 
Wasabi comes powdered in a cute little tin.
Avoid eye contact!

Mix powder with water adding as needed until a play-doh like consistency is obtained.


When the rice is done cooking empty it out into another bowl for it to cool.  Cool for about 20-25 minutes.  You can mix it around a little bit while it is cooling, but don't mix it too much or it might get mushy!  When rice is cooled down add 2-3 Tbsp. rice vinegar.


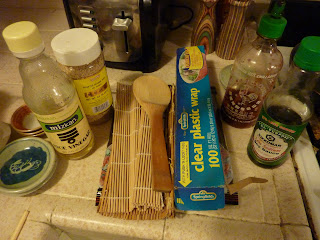
Here's some of the supplies you will need!  From left to right: small dishes for soy sauce, rice vinegar, sesame seeds, sushi rolling mats, flat wooden spoon for rice spreading, plastic wrap, sriracha sauce, soy sauce

For California Rolls you need: cucumber cut into matchsticks, imitation crab meat, and avacado.


The seaweed aka nori comes in sheets.  To make bite size sushi I use half a sheet.

Fold in half to create a crease and then carefully cut in half

Lay out a sheet of plastic wrap on your sushi mat.  Place sushi shiny side up.

Using wooden spoon carefully spread rice onto seaweed.  The rice will be very sticky so it is helpful to have a bowl of water nearby to dip the spoon into.  When rice is evenly spread in a thin layer sprinkle on the sesame seeds.

Ok. Then you carefully lift up the rice coated seaweed and flip it upside down so the rice is now face on the plastic wrap.  Arrange ingredients in a strip in the center.


Then using the sushi mat, start rolling the sushi up.  This part is the hardest to explain!  It usually takes a few trys before getting it right the first time you attempt this.  Usually you fold it over into itself once, squeeze it, lift mat and plastic wrap and then fold it over again.


Then with the sushi still rolled up in the plastic, use a sharp knife to cut the roll into pieces.

Remove plastic and place sushi on serving plate.
Soon you will have a plate full of delicious, fresh sushi!
Serve with soy sauce, wasabi and sriracha.


Oh so Easy Hummus

I couldn't think of anything simpler.
This recipe was taught to me by my friend Zaki.
Garbanzo beans are also called chickpeas.  Sometimes I think there should be dudepeas to keep the chickpeas company...Anyways, moving right along...


Ingredients
1 can garbanzo beans
1 Tbsp. Tahini
1-2 tsp. garlic
Juice 1 lemon

You will need a food processor or blender.
Blend until smooth!
Serve with pita bread


Monday, February 14, 2011

Tahini Salad Dressing


This is the my favorite salad dressing recipe EVER!
I buy tahini at North Park Produce down the street from my house.
Tahini, or sesame seed paste is also used in making hummus,
so having a jar around is always a good idea :)


Ingredients
1 Tbsp. tahini
Juice of 1 lemon
2 cloves garlic, minced
1/2 Tbsp. soy sauce
1/2 Tbsp. oil
2 Tbsp. water
Salt and Pepper


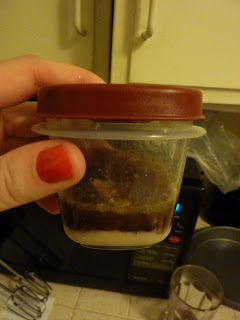
If I'm taking it to work I will just pour all of the ingredients into a small spill proof container...


Then just shake it up and you can mix it all in the container!


Goes great with a salad topped with cucumbers and sunflower seeds!


Chocolate Orange Cake

I came across this recipe while looking for recipes for my entry for my work's holiday party bakeoff in December.  I ended  up making chocolate bacon mini cupcakes, but this chocolate orange cake stuck in the back of my mind.  Part of the reason I was hesitant to tackle it at first was that is uses an ingredient I had never used before- ground almond meal, and the fact that the measurements for the ingredients were European, so grams and degrees celsius!  In the end I decided to face my fears and attempt this recipe.

I found several versions of this cake, some with chocolate and some just orange and almond. 

This website featured a recipe for almond orange cake and also had a video showing the process of making the cake.  From this website I learned that, "Flourless Orange and Almond Cake is a classic Passover dessert drawing on the Sephardic traditions of Morocco, the Mediterranean and the Middle East (where citrus was more available)"  Interesting!....

I ended up using the recipe from this website:

Ingredients
2 Oranges
6 Eggs
1 tsp. baking powder
50 g. Cocoa Powder
200 g. Ground Almonds
250 g. Caster Sugar

Boil the oranges for 1 hour.


 The almond meal was hard to find!  Henry's had it, but they were all out of it.  After checking Ralph's and Vons I finally found it at Whole Foods.  And it wasn't cheap! About $10 for the package.


This is probably the first time my roommate's kitchen scale has ever been put to use.
Measuring out the "caster sugar" which I learned is just another name for "superfine sugar."
I converted the grams into pounds using a conversion calculator online.


Also an opportunity to bust out my electric mixer! Yay!


So preheat to 170 celsius or as we like to say in America 338 fahrenheit?
and butter a 23 cm (9 inch) pan.  Blend the oranges skin and all!  I used a food processor.
Then mix everything else up, pour into pan and pop into the oven for 50 minutes-1 hour.


It came out super moist and had a strong chocolate orange flavor.
An experiment ending in success!


Wednesday, February 9, 2011

Carrot Cake

I've probably made about 8 different carrot cake recipes in my life time, and they have all turned out pretty good.  I used to use the website http://allrecipes.com/ to find recipes.  Now I almost exclusively (and obsessively) use http://foodgawker.com/ to find recipes.  Anyways, carrot cake is one of my boyfriend's favorite desserts, so that's why I have made it so many times.  This recipe is a kindof healthier version with some whole wheat flour, applesauce and only 1/4 a cup of oil.  The cream cheese frosting with lemon zest makes it especially delicious.

I got this recipe from: http://www.handletheheat.com/2009/08/healthier-carrot-cupcakes.html

Ingredients
3/4 cup whole wheat flour
1/2 cup all-purpose flour
1 tsp. baking soda
1/4 tsp. salt
1/2 tsp. cinnamon
1/4 tsp. nutmeg
1/4 cup canola oil
3/4 cup light brown sugar
2 eggs
1/2 cup natural apple sauce
1/2 tsp. vanilla
1 1/2 cup shredded carrots (2 carrots)
1/4 cup chopped walnuts
4 oz. cream cheese
3/4 cup confectioners' sugar
1/2 tsp. lemon zest

-Preheat oven to 350
-Mix first 6 ingredients (flour-nutmeg)


-Then mix oil, eggs and brown sugar


-Peel and shred the carrots


-Add carrots, applesauce and vanilla to the egg mixture.


-Then add in the dry ingredients and mix until blended.  Last stir in the walnuts. 
-Pour into muffin cups and bake for about 20 minutes.


-Let cool and then frost.
-To make frosting use a mixer to blend cream cheese, confectioners' sugar and lemon zest.
-Top with additional walnut pieces.


Ta-DA!


Tuesday, February 8, 2011

Heaven Sent Desserts

Heaven Sent Desserts

"For the longest time I thought it was some sort of religious bookstore."

If you worship creme brulee or pray to the god of chocolate this place truly is your temple.
Even if you aren't devout chocoholic you can have a religious experience eating the deserts here.

I visited this palace of pasteries, Mecca of mocha etc. last month in honor of my birthday with my friends Belen and Dan


and Aldo and Steve. 
The more people you bring the more desserts you get to sample ;)


They put your order number in a children's book.  I got Squirrel Nutkins.


I ordered the peanut butter and jelly dessert.  And yes it was amazing.


Aldo and Belen got this thingy.  It was a berry compote with merlot. 
Those who were present will remember the disasterous after effects. These included tummy aches and not making complete stops...


Steve's fancy pants mexican mocha


Afterwards we were too full to do anything else.
....And they lived happily ever after
The End

Chocolate Covered Bacon

Two of man's greatest inventions: Bacon and Chocolate.  Put them together and it is a winning combination.

Borrowed the recipe idea from: http://www.culinaryescapade.com/?p=574


First step is to cook the bacon until crispy. 


Then melt some semi-sweet chocolate.  This is where I encountered a problem!  The recipe I was following said to melt the chocolate in a microwave safe dish by cooking for about 2 minutes.  I did that, but didn't really see the chocolate starting to melt so I put it in for another 2 minutes.  When I checked it the chocolate was hard and crumbly and starting to smell a little burned, so I knew something was not right.  I ended up adding in a splash of almond milk that I had on hand to add moisture to the mixture.  This saved the chocolate...kind of.  It came out tasting fine, but the chocolate never really set or hardened completely. 


And now for the secret ingredient!.......


Cayenne Pepper!  The recipe I used was vague on how much to use.  I put about a teaspoon into the chocolate mixture, but in the end didn't really taste much spiciness.

Now dip the bacon into the chocolate. Place chocolate covered bacon on a cookie sheet covered with wax paper for refridgeration.  It should resemble little poops!

Bacon and chocolate together at last!


I know it sounds strange, but you must try the combination of bacon and chocolate at least one time in your life.  I like this recipe because it breaks it down to the essential ingredients. I have also made candied bacon chocolate chip cookies, and bacon chocolate cupcakes.