Saturday, January 29, 2011

Peanut Soba Noodles


Start with soba noodles.  Your first step will be to boil water.


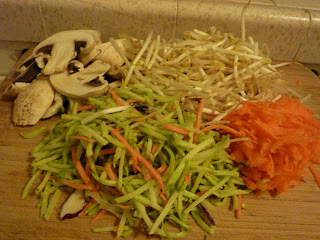
Then select what vegetables you want to mix in with your noodles.  I used some pre-packaged broccoli slaw, shredded carrots, bean sprouts, and mushrooms.  You could also used bell pepper, snow peas, water chesnuts, green onions etc..


I decided to cook the broccoli and mushrooms a little bit.  I added in the carrots and bean sprouts raw.


For the sauce mix 4 Tbsp. peanut butter, 4 Tbsp. rice vinegar, 2 Tbps. soy sauce, 2 Tbsp. honey, and Sriracha to taste.
I borrowed the sauce recipe from http://thepioneerwoman.com/tasty-kitchen/recipes/salads/spicy-peanut-soba-noodles/ and doubled the recipe.


When you mix up the sauce it will seem kind of thick and chunky, but it will melt and thin out when you add the sauce to warm noodles.


The noodles cook fast-only about 4 minutes!  Drain noodles and then add vegetables and sauce and mix together.  Garnish with chopped peanuts.  It's also great served cold!


Tuesday, January 25, 2011

Guava Pops!


Coworker hates guavas!  Laura reaps the benefits!
So my coworker Alex can't stand guavas and is repulsed by their smell. 
He has a guava tree in his backyard so he brought a bunch of guavas to work to share.
I took some and wasn't really sure what I was going to do with them.  I looked online for recipes and couldn't find much that used fresh guavas.  I decided to make guava popsicles!

The guava does have a distinct odor, but I think it's stinky in a good way! It makes me think of a tropical island paradise and drinking mai tais out of a pineapple.


Cut up the guava and removed the hard seeds.


I added a couple Tbsp. sugar and then I pureed it in the food processor.


Then I pour it into popsicle molds and froze overnight.


In the morning popsicles!
I didn't like the pops that much so I decided to chop them up and use them in smoothies.  My one tip about making smoothies is don't start pouring ingredients into the blender!  Then you won't know how much to put in and you won't be sure how much will come out.  The best way is to measure it all out into a glass first and then you will know for sure how much it will make and that it's all going to fit into one glass. 
First add fruit (frozen guava and berries)


Then add enough juice to cover fruit (apple juice)


Then blend!


Monday, January 24, 2011

Microwave Bacon Cooker Put to the Test


Bacon. One of man's greatest inventions.

Behold
Aromatic
Crunchy
Object of my desire
Nibble nibble

Tonight's topic is my brand new microwave bacon crisper.  I put this new gadget to the test a few nights ago and had a pretty successful test run. 


Basically you drape the bacon on the cooking racks and then all of the grease drips down into the tray. 


Load it up!  Then cover with a paper towel to reduce splatter.  The directions say to microwave on high- one minute for each piece of bacon.  I  had 12 pieces of bacon so I started off with microwaving it for 10 minutes.  By the end of the cooking time there was alot of alarming popping and splattering noises so I didn't cook it longer, but I found that the pieces on the middle rack weren't quite as crispy as I would like so next time I would cook it a little longer.  For clean up you can pour the bacon grease out of one of the tray's corners pretty easily.  Then wash with soap and water.  This would be a real cinch if you have a dishwasher, but I don't so my conclusion is that it's only slightly less messy than just using a regular frying pan.  One advantage might be that I could be cooking other things in my frying pans while I am cooking the bacon in the microwave...


Add some tomato


and some lettuce


and enjoy BLTs!


Thursday, January 20, 2011

Two slightly hungover VSAs bake a pie

Presenting my first guest chef...Lauren Marallo! 
My beloved goose and coworker, Lauren is quirky, sweet, and crafty.  Whether it be knitting a scarf, or baking pumpkin spice cookies she always has some kind of creative project underway.  And there’s no one I’d rather pit 2 ½ pounds of cherries by hand with..using only a toothpick :)


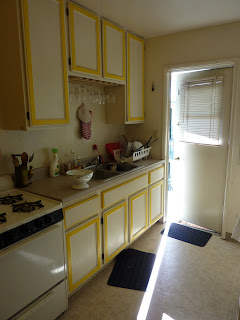
Quirky vintage kitchen decor...check!
Cherry print aprons....check!
Red lipstick......check!
Now turn on the oven and we're ready to bake some pie!


We borrowed the cherry pie recipe from this website:
http://smittenkitchen.com/2008/06/sweet-cherry-pie/

Ingredients:
Dough for a double-crust pie (we used Lauren's great grandma's secret recipe for the crust)
4 cups pitted fresh cherries (about 2 1/2 pounds unpitted)
4 tablespoons cornstarch
2/3 to 3/4 cup sugar (adjust this according to the sweetness of your cherries)
1/8 teaspoon salt
Juice of half a lemon
1/4 teaspoon almond extract (we used vanilla extract instead)
1 tablespoon cold unsalted butter, cut into small bits

Preheat oven to 400°F.

(I like this picture because you can see the chocolate santa in the background!)

Pit the cherries using a toothpick. 


Then mix together cherries, cornstarch, sugar, salt, lemon, vanilla extract and butter.


Pour into pie shell


Top with pie crust and seal edges


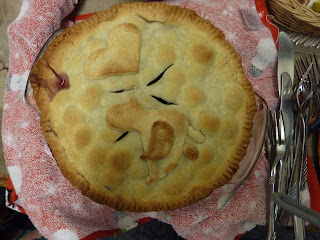
Bake until crust is golden brown


Ta-da!


For best results bring your pie to work to share with coworkers


It came out a bit soupy, but all agreed it tasted delicious!


Monday, January 17, 2011

The Regal Beagle


This dog is definately barking up the right tree.
Come here for Mans best friend...Beer!


The Reagle Beagle is located on India Street.  We decided to stop in for a drink before heading over to
the Shakespeare Pub for music trivia night.  Delicious brews and tasty snacks.  For example, the GIANT PRETZEL with cheese dipping sauce...


And mini corndogs! Yipee!


Another highlight was the Mustard Station


A few things to remember about Beagles:
Beagles Love Blueberries!
and
Never look a beagle in the eye!


Sunday, January 16, 2011

Ode to Cheese...

The word of the day is "Turophile." by definition a lover or connoisseur of cheese! 

You know you have a cheese addiction when you plan on naming your first born daughter Brie or Cheddarella.  Me and cheese have a long history, and the roots of my obsession can be traced back to my childhood.  The earliest records can be found in my middle school year book where every single person who signed my yearbook refered to me as “cheez girl.”  Yikes! In highschool, one of my defining moments was being photographed with String Cheese Man: 


I wont bore you with all of the details of my personal cheese history.  A more recent cheese adventure took place when fellow turophile Molly gave me the grand cheese tour up in Washington.  We visited Beecher’s cheese shop at Pike Place Market in Seattle, where you can shop for cheese, watch people making cheese and eat cheese all at the same time!  This goes on record as the best Macaroni and Cheese I have ever had!  Apparently Oprah agrees with me: http://www.beechershandmadecheese.com/


 We also took a cheese making class at Blue Rose Dairy (http://bluerosedairy.com/).  At this small scale farm and dairy we were shown the ropes of cheese making by a conservative middle aged woman who somehow manages to  run a small cheese making business, homeschool all of her children, And  teach complete strangers how to make cheese from scratch in her farmhouse kitchen!

Macaroni and Cheese has been one of my favorites since I can remember.  Back in highschool my friend Dominique and I used to make the Kraft version on a weekly basis. Sometimes we would take a mac & cheese picnic to our favorite canyon hideout, "The Hobos Nest."  Later on we realized that the Hobos Nest wasn't really an exclusive hideout when we found our holy grounds desecrated by a sleeping bag and a porno magazine, but for the time being we were happily content to huddle and eat the cheesy elixer by the bowlful.
Anyways, here's one of my favorite recipes for macaroni and cheese.  The recipe is from Saveur magazine:

Kosher salt, to taste
12 oz. hollow pasta, preferably penne
6 tbsp. unsalted butter
3⁄4 cup dried bread crumbs, preferably panko
1 oz. finely grated Parmesan (about 1 cup)
1⁄4 cup flour
3 1⁄2 cups milk
4 oz. grated Gruyère (about 1 1⁄2 cups)
4 oz. grated Comté or Cantal (about 1 1⁄2 cups)
4 oz. grated fontina (about 1 1⁄2 cups)
Freshly ground black pepper, to taste

1. Heat oven to 350°. Bring a 4-qt. saucepan of salted water to a boil. Add the pasta and cook until not quite al dente, about 7 minutes. Drain pasta, transfer to a bowl, and set aside.

2. Melt 3 tbsp. of the butter in a 4-qt. saucepan over low heat. Add the bread crumbs and Parmesan, toss to combine, and transfer to a small bowl; set aside.

3. Wipe out the saucepan and set over medium heat. Melt the remaining butter and whisk in the flour until smooth. Whisk in the milk and cook, continuing to whisk often, until the sauce coats the back of a spoon, about 10 minutes. Stir in the Gruyère, 1 cup of the Comté, and 1 cup of the fontina and whisk until the cheese is melted and incorporated. Season with salt and pepper. Remove pan from heat and stir in the reserved pasta. Pour the mixture into a 2-qt. baking dish and top with the remaining Comté and fontina. Sprinkle bread crumb mixture over the top and bake until golden brown and bubbly, about 30 minutes. Let cool for 10 minutes before serving.
 
This is the shredded fontina cheese.  I also used parmesan, but instead of the other fancy cheeses the recipe calls for, I substituted a  preshredded Italian cheese mix.  I think you can use any kind of meltable cheese and this recipe will come out good. Enjoy!


I hereby dedicate this post to my one true love: CHEESE!


Monday, January 10, 2011

Kale Bean Dip

This recipe is from The Whole Foods Market Cookbook and was recommended to me by my Aunt Bobbie.  The first time I made this recipe it was my first time trying kale, it was a success, and now it has become one of my favorite recipes.  I couldn't find the exact recipe so this version is from memory:

Ingredients
1 bunch of kale
2 15oz can white beans
3 clove garlic, minced
1-2 Tbsp oil
1 Tbsp soy sauce
2 c. cheddar, shredded
Salt and pepper to taste
½ c. chopped almonds

-Start by preheating oven to 350 and putting a large pot of water on the stove to boil
-Prep by removing hard stems from the kale leaves, and drain and rinse beans.


-Then you blanch the kale.  Basically, throw all of the kale into the boiling water. Push the kale down into the water with a spoon to submerge and cook for 5 seconds.  The kale will turn bright green.  Turn of heat, dump kale into a colander to drain and give a quick rinse with cold water.  When cool enough take the kale and coarsely chop.


-While the kale is cooling you can cook the garlic.  Heat oil to medium high heat, add minced garlic and cook stirring constantly 30 sec.  Be careful not to burn.
-In a large bowl combine beans, garlic and oil, chopped kale, soy sauce, cheddar and salt and pepper. Stir until combined and then pour into a small casserole dish.


-Chop almonds and sprinkle on top of the bean mix. You can also use pre-sliced almonds.


-Bake uncovered 20 minutes or until cooked through and cheese is bubbly.
-Serve with crackers, chips or crusty bread!